Student IT Guides
Getting Started
In order to access any William Carey University online service, a student must first have a Student Status that would allow him or her to register for classes. The Office of Admissions is in charge of changing Student Status, but a student may check his or her progress by using the myStatus page. Once a student has a Status that will allow registration, the student's Indigo Student Portal account may be activated
All users of WCU OIT accounts and services are subject to our Acceptable Use Policy. A copy of the AUP is available here: Acceptable Use Policy
The myStatus page will assist in communicating with Carey students about the status of their admissions and registration information through the Indigo Portal. This page contains important information pertaining to a student's individual standing with various departments across campus. It will allow a student to be more involved and responsible for the admission application, class registration, and advisement processes. Below is a breakdown of the information available to students and faculty members on the My Status page. This information is available to students through the Indigo Student Portal and faculty through the Indigo Faculty Portal.
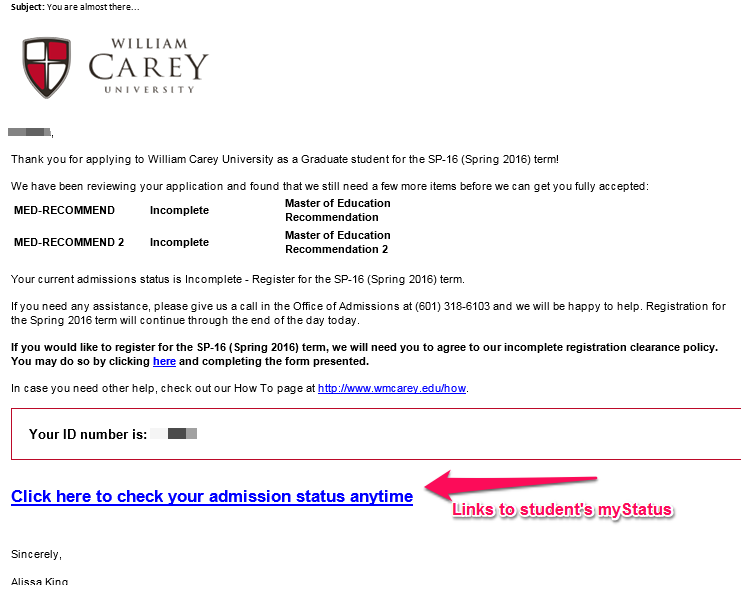
After submitting the Admissions application, students will receive an email providing information about the status of their admission application and a link to the myStatus page in the Indigo Student Portal.
Within this email, non-current students will have the opportunity to click a link in order to generate a Clearance Form for Pre-Registration.
Students can continue to check the status of their application at any time using the link within the email. This link will provide up-to-date admission information until the application is complete.
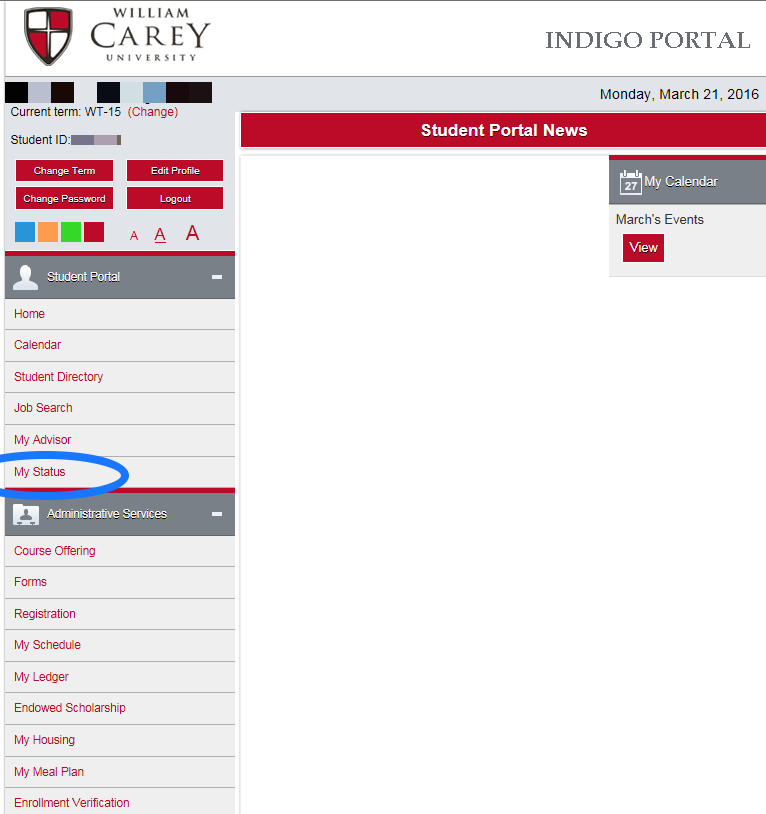
Current students may check their eligibility to register from the myStatus option in the Indigo Portal. Make sure you select the current registration term.
Indigo PortalCurrent students may click here in order to view directions on Registration.
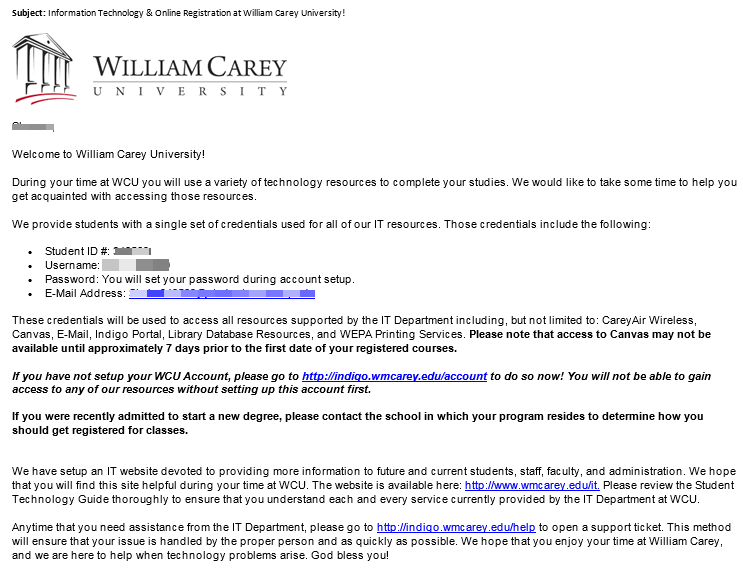
RegistrationAfter a non-current student completes a Clearance Form or is moved to full Acceptance, the student will receive an email describing the process to set up a WCU account. This will allow access to the Indigo Student Portal, Canvas, and Student Email.
myStatus is located in the Indigo Portal and provides current information to allow students to manage their admissions and registration information at Carey.
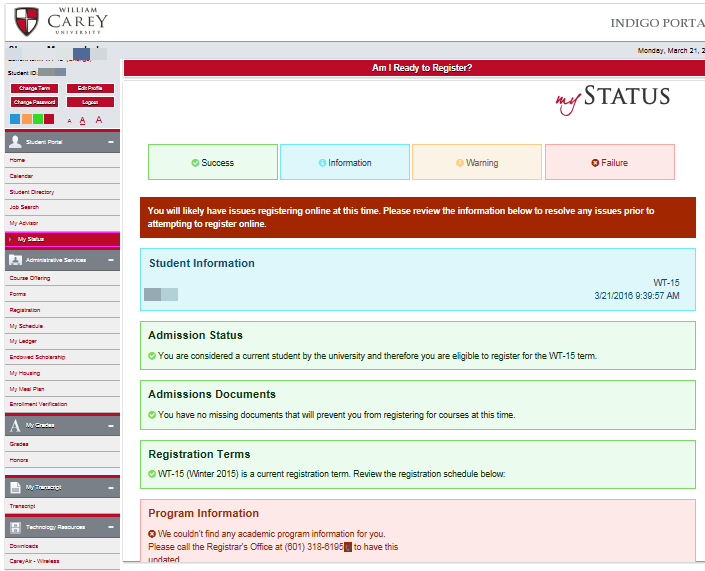
Blue boxes represent general information about the student's profile that does not require any action on the student's behalf.
Green boxes represent required data fields and procedures that have been properly completed in order to allow registration.
Orange boxes represent partially incomplete information. Information in an orange box may allow a student to register for their first term but may cause registration issues in future terms.
Red boxes represent a failure to properly supply data or complete procedures essential to registration. All information in red boxes must be addressed before a student may register for classes.
The boxes listed under a particular student relate specifically to his or her current state in the registration process. Not every student will be in the same step of the registration procedure which means that you may or may not see all of these boxes under your profile.
- Admissions Status: This box contains the student's current status in the Office of Admissions. A student may move through several different statuses in his or her admissions process, and not every status will allow registration. Information on the student's most recent application and how to contact the Office of Admissions has been supplied for the student.
- Admissions Documents: This box lists important documents that the student will need to submit to the Office of Admissions. Documents that are listed in bold are missing. Contact information for the Office of Admissions has been supplied for the students.
- Admissions Status Notification: This box displays the student's current Admissions Status. This box will also display whether or not clearance email has been sent to a non-current student. Faculty and Staff will have an option to re-generate the email.
- Admissions Clearance: This box shows whether or not a non-current student has completed a Clearance Form to allow pre-registration.
- Registration Terms: This box will display whether or not the term for which a student applied is currently open for registration. It includes dates for Pre-Registration, General Registration, and Late Registration. Also included is a link to view any special registration events that have been scheduled.
- Program Information: This box will display a student's declared major(s) and minor(s). It will also display whether or not a program has been chosen as a student's primary course of study. Each student must supply a major. Students who are unsure of their programs may select Undecided as a major. Contact information to the Registrar's Office has been supplied if any items need to be addressed.
- Religion Information: This box displays a student's chosen religion. Each student must declare a religion of preference. If the student chooses Southern Baptist, he or she must also supply the name of the church attended. Contact information to the Registrar's Office has been supplied if any items need to be addressed.
- Missing Transfer Transcript: This box lists all currently outstanding transcripts that the Office of Admissions needs in order to determine a transfer student's admission or rejection. The student is prompted to contact their former institutions in order to have the transcripts sent to WCU.
- Transfer Transcript Evaluation: This box lists all transcripts that the student has properly submitted that have not been evaluated by the Registrar's Office.
- Advisor Information: This box displays whether or not a student has been assigned an advisor. Each student must be assigned an advisor before being allowed to register. If the student has been accepted, there will be a prompt for the student to contact his or her School in order to have an advisor assigned. If the student has not been accepted, the student will be prompted to complete the Admissions process.
- Advisor Clearance: This box displays whether or not a student has received clearance to register from his or her advisor. If an advisor has been assigned, the student will be prompted to contact his or her advisor by name. If no advisor has been assigned, the student will be prompted to contact his or her School in order to have an advisor assigned.
- Registration Holds: This box displays any holds that may be on the student's account. The student may have multiple holds from multiple Offices on campus. Not all holds stop registration, though many will need to be removed before registration can be completed. Contact information for each department with a hold on the student's account is listed.
- Information Technology Account: This box will note whether or not a student has successfully activated an Indigo Portal account. Additional information is provided to prompt the student to setup the account if he or she has been accepted or explain why the account cannot currently be setup.
- Information Technology Welcome Letter: This box will note whether or not a student has been sent the IT Welcome Letter. If the letter has been sent, the email address to which it was sent is listed. If the letter has not been sent, the student is prompted to contact the Office of Admissions in order to check his or her admissions status.
In order to activate an Indigo Student Portal Account, a student must have a Student Status that allows registration. See above for a guide to the myStatus page.
Depending on a student's status, he or she may need to fill out an Online Clearance Form. This form will be automatically delivered to the student's personal email address. It must be filled out online and submitted before the student can access the Indigo Student Portal.
After a non-current student completes a Clearance Form or is moved to full Acceptance, the student will receive an email describing the process to set up a WCU account. This will allow access to the Indigo Student Portal, Canvas, and Student Email.
Getting Connected
You must activate your Indigo Student Account before logging onto the Wi‑Fi network.
Follow these instructions to get your personal Mac computer connected to the William Carey University Wi-Fi network.
- Click the Wireless symbol
- Choose the wireless network: CareyAir
- If Under Security Type, select WPA2-Enterprise
- Input your Username
**Do not include "@student.wmcarey.edu" or "@wmcarey.edu"** - Input your Password
- Click the box next to Remember this Network, if an option is provided
- Click Join or Connect
- If prompted with a Verify Certificate warning, follow these steps
- Click Continue
- Input the Username and Password that you use to log on to your computer.
- Click Update Settings
- Your computer should automatically connect to the wireless network
Follow these instructions to get your personal Windows computer connected to the William Carey University Wi-Fi network.
Please choose from the options below based on your Windows Operating System.
For users with Windows 10
- Click the Wireless icon
- Choose the network: CareyAir
- Ensure that "Connect automatically" is checked
- Click Connect
- Input your Username
**Do not include "@student.wmcarey.edu" or "@wmcarey.edu"** - Input your Password
- Your computer should automatically connect to the appropriate network
For users with Windows 8 or older
- Right-click the Wireless Icon from your taskbar in the bottom right corner.
- Select Open Network and Sharing Center
- Select Set up a new connection or network
- Click Manually connect to a wireless network
- Click Next
- Input the Network Name: CareyAir
- Under Security Type, select WPA2-Enterprise
- Click Next
- Click Change connection settings
- Click the Security Tab
- Click Settings
- Under the heading When connecting, make certain that the box for Validate server certificate is unchecked
- Click Configure...
- Under the heading When connecting, make certain that the box for Automatically use my Windows logon name and password (and domain if any) is unchecked
- Click Ok
- Click OK
- Click Advanced Settings
- Check the box next to Specify authentication mode
- Click User or computer authentication
- Click User authentication
- Click Save credentials
- Input your Username
**Do not include "@student.wmcarey.edu" or "@wmcarey.edu"** - Input your Password
- Click Ok
- Click Ok
- Click Ok
- Click Close
- Your computer should automatically connect to the appropriate network
For users with Windows 10
- Click the Wireless icon
- Choose the network: CareyAir
- Ensure that "Connect automatically" is checked
- Click Connect
- Input your Username
**Do not include "@student.wmcarey.edu" or "@wmcarey.edu"** - Input your Password
- Your computer should automatically connect to the appropriate network
Follow the directions below in order to connect your iOS device (iPhone, iPod) to the William Carey University wireless network.
- Tap Settings
- Tap Wi-Fi
- Under Choose a Network, tap Other
- Input the Name of the network: CareyAir
- Tap Security
- Tap WPA2 Enterprise
- Click the arrow back to Other Network
- Input your Username
**Do not include "@student.wmcarey.edu" or "@wmcarey.edu"** - Input your Password
- Tap Join
- If prompted with a message concerning a Certificate that is Not Verified, tap Accept
Follow the directions below in order to connect your Android device (Cellular Phone, Tablet) to the William Carey University wireless network.
- Tap Settings
- Tap Connections
- Tap Wi-Fi
- Tap Add network
- Input the Network name: CareyAir
- Tap Security
- Tap 802.1x EAP
- Tap Select certificate
- Tap Don't Validate
- Input your Username in the Identity field
**Do not include "@student.wmcarey.edu" or "@wmcarey.edu"** - Do not put any information in the Anonymous identity field
- Input the domain name as: wmcarey.edu
- Input your Password
- Tap Connect
Follow these instructions to get your personal Chromebook connected to the William Carey University Wi-Fi network.
- Click on the Network icon in the lower right corner of your screen.
- Select your network status from the menu that appears
- Select Join Other...
- Select Advanced
- Input the SSID: CareyAir
- For EAP method, select PEAP
- For Phase 2 authentication, select MSCHAPv2
- For Server CA certificate, select Do not check
- For User certificate, select None installed
- For Identity, input your Username
**Do not include "@student.wmcarey.edu" or "@wmcarey.edu"** - Input your password
- Leave Anonymous identity blank
- Check the box beside Save identity and password
- Click Connect
- Your Chromebook should connect to the network
The Entertainment wireless network was created to allow students to connect numerous devices to wireless that were previously disallowed on the WCU wireless network due to their lack of support for enterprise-grade security and encryption. This network will support gaming consoles, late model phones, TVs, and some wireless printers.
You must register your devices in the Indigo Portal, https://indigo.wmcarey.edu/student/wcuMACAddress.asp, if you would like to connect your device to the Entertainment network.
After registering your device, please wait 1 hour then attempt to connect your device to the network: Entertainment. If you are still unable to connect, students should open a support request with the Helpdesk at https://indigo.wmcarey.edu/help. Staff should open a support request at https://help.wmcarey.edu or by emailing help@wmcarey.edu.
Please note that you are entirely responsible for any network activity that originates from any device registered under your account in the Indigo Portal. If you register a device with your account and activity which violates university policy or the law is detected from the device, you will face disciplinary action which could include denial of university network usage or dismissal from the university.
Getting Equipped
You must uninstall all versions of Microsoft Office that are currently on your computer including trial versions.
- Click here or navigate to https://login.microsoftonline.com
- Input your entire William Carey University email address
- Student email addresses follow this format [username]@student.wmcarey.edu. Your username is the first letter of your first name, your entire last name, and your student ID number. For example, a student named John Doe with the Student ID number 123456 has the username JDoe123456 and the email address jdoe123456@student.wmcarey.edu. You will not be able to access Office365 until you activate your Indigo Student Portal Account.
- Faculty and staff email addresses follow this format [username]@wmcarey.edu. You will receive your username upon the completion of your in-processing with HR.
- Click Next
- Input your password
- Click Sign In
- If prompted for with the option to "Stay Signed In?" choose whichever option you prefer
- In the top right corner, click the button to Install Office Apps
- Click the option for Office 2016
- Follow the prompts that appear on screen
Follow these instructions to set up your student WEPA account.
You must activate your Indigo Student Account before accessing WEPA services.
- Click here or navigate to https://www.wepanow.com.
- In the top right corner, click Login
- Select William Carey University from the School list
- Input your entire William Carey University email address
- Student email addresses follow this format [username]@student.wmcarey.edu. Your username is the first letter of your first name, your entire last name, and your student ID number. For example, a student named John Doe with the Student ID number 123456 has the username JDoe123456 and the email address jdoe123456@student.wmcarey.edu.
- Input your password
- For additional support, check the WEPA support page here.
Follow these instructions to configure your Microsoft OneDrive cloud storage area.
The computer you are using must have a version of Microsoft Office that is associated with a William Carey University student, faculty, or staff account for this process to work.
- Open the OneDrive program
- Input your entire William Carey University email address
- Student email addresses follow this format [username]@student.wmcarey.edu. Your username is the first letter of your first name, your entire last name, and your student ID number. For example, a student named John Doe with the Student ID number 123456 has the username JDoe123456 and the email address jdoe123456@student.wmcarey.edu. You will not be able to access Office365 until you activate your Indigo Student Portal Account.
- Faculty and staff email addresses follow this format [username]@wmcarey.edu. You will receive your username upon the completion of your in-processing with HR.
- Click Next
- Input your password
- Click Sign In
Once you have signed in, you may view your OneDrive folder in Windows Explorer in the same way that you can view your Documents folder.
OneDrive will now appear as an option when you save a file.
Still can't find what you're looking for?

Hattiesburg
WCU Box #147 | 710 William Carey Parkway | Hattiesburg, MS 39401
help@wmcarey.edu | (601) 318 - 6378